

If you’ve ever dreamed of making your own maple syrup, you’re in the right place. Tapping maple trees is an enjoyable, rewarding activity, and the best part?
You don’t need to be an expert to start. It’s all about timing, the right tools, and a little bit of patience. So, let’s break it down step by step.
How Does Maple Tapping Work?
In simple terms, maple tapping is collecting sap from trees (primarily sugar maples) and turning it into syrup by boiling it down. While sugar maples are preferred for their higher sugar content, you can also tap red and black maples.
With a little sap and a bit of boiling magic, you’ll have syrup that you can proudly say came from your own backyard.
When Should You Tap?
Timing is everything when it comes to maple tapping. The ideal season is late winter into early spring when daytime temperatures rise above freezing and nighttime temps drop below.
This weather fluctuation creates the pressure that moves sap through the tree, allowing it to flow when you tap. The whole season usually lasts about 4 to 6 weeks, typically starting in late February or early March, depending on where you are.
How to Choose the Right Tree
Not every maple tree is ready to give up its sap. For the best results, make sure the tree you choose is at least 10 inches in diameter. The general rule is:
- 10-20 inches in diameter = 1 tap
- Over 20 inches in diameter = 2 taps
- More than 27 inches in diameter = 3 taps
Larger, healthy trees with full crowns produce more sap, so keep an eye out for those when making your selections.
Tools You’ll Need
Before you start, gather your tools:
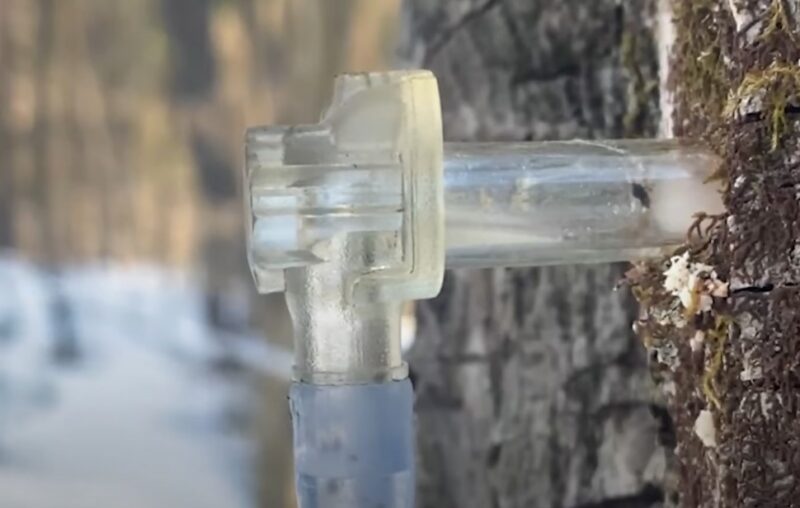
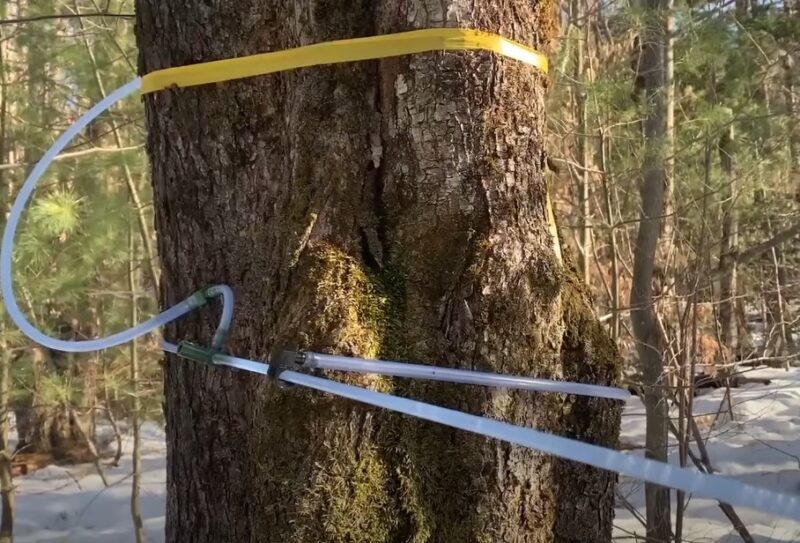
- Spiles (taps): These go into the tree to let the sap flow.
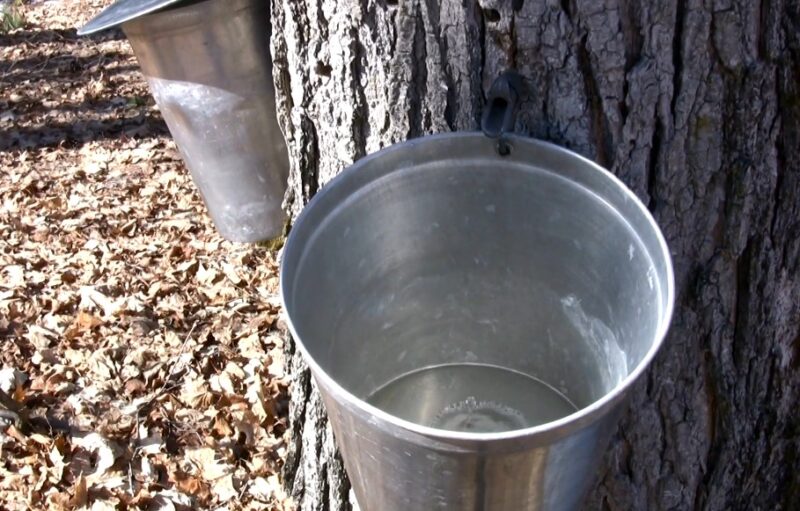
- Buckets or tubing: Buckets catch the sap, or you can set up tubing to transport it to a central collection container.
- Drill and bit: A 5/16 or 7/16 inch drill bit works well for making the hole.
- Hammer: Helps you gently tap the spile into the tree.
- Lids: If you’re using buckets, lids will keep debris out of your sap.
- Large pot: Needed for boiling down your sap.
- Thermometer: Helps track the sap’s temperature during the boiling process.
Once you’ve got everything, you’re ready to get tapping.
How to Tap the Tree
With your tools in hand, it’s time to start.
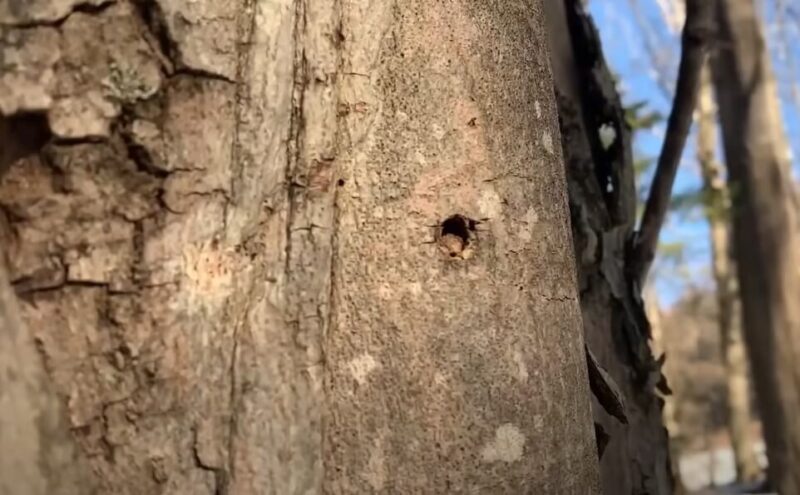
- Find the Perfect Spot: Look for a place on the tree where the sap flow is highest. The sunny side of the tree, just above a large root or below a big branch, is usually ideal.
- Drill the Hole: Use your drill to make a hole about 1.5 to 2 inches deep at a slight upward angle. This angle helps the sap flow out more easily.
- Insert the Spile: Gently tap the spile into the hole with a hammer until it’s snug. Don’t force it in too hard—just enough so it holds.
- Hang Your Bucket or Attach Tubing: Once the spile is in place, you can hang your bucket or attach your tubing to start collecting sap.
Once your tree is tapped, sap should start flowing, especially on those warmer days.
Collecting Sap & How Much to Expect
Now that the sap is flowing, check your containers regularly. On a good day, one tap can produce up to a gallon of sap. Remember that sap is mostly water (about 98%), so you’ll need quite a bit—roughly 40 gallons of sap to make 1 gallon of syrup.
The weather plays a big role here. The more the temperatures fluctuate between warm days and freezing nights, the better the sap flow will be. Some days you may collect a lot, while others, not so much.
Boiling Down the Sap
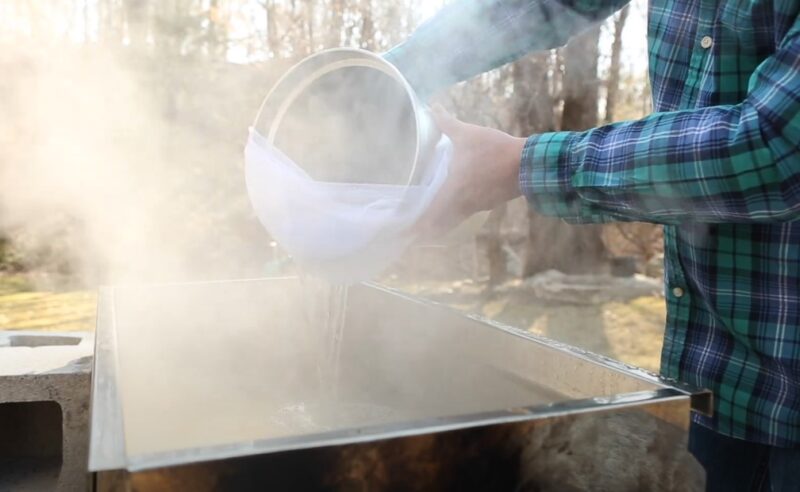
Once you’ve collected enough sap, it’s time to boil it down to make syrup. Be warned—this process creates a ton of steam, so it’s best done outside or in a well-ventilated area.
Steps for Boiling
- Set up Your Boiling Station Outdoors: Since you’ll be boiling a lot of water off, avoid doing this inside your house unless you’re a fan of sticky walls.
- Start Boiling: Pour your sap into a large pot or evaporator and bring it to a boil. Keep an eye on it, as the sap becomes more concentrated and thicker.
- Skim off Impurities: As the sap boils, foam and sediment will rise to the top. Use a skimmer or cheesecloth to remove it.
- Monitor the Temperature: Syrup is ready when it reaches 219°F (that’s 7°F above the boiling point of water). This temperature ensures your syrup has the right sugar content (about 66%).
Finishing Touches
Once the sap hits that magic number on your thermometer, filter it one more time to get rid of any remaining sediment (called sugar sand). After that, you’re ready to bottle up your liquid gold.
Storing Your Homemade Maple Syrup

Once your syrup is done, store it properly to enjoy it throughout the year. Pour the hot syrup into sterilized jars and seal them tightly.
Unopened syrup can be kept in a cool, dark place for up to a year. Once opened, it should go into the fridge to keep fresh.
Will Tapping Hurt the Tree?
The short answer is no—tapping won’t hurt the tree if done correctly. The small holes you drill will heal over time, and the tree will keep on growing. Avoid over-tapping or making holes that are too big, as that can stress the tree.
As long as you follow the guidelines for the number of taps based on the tree’s size, you’ll keep the tree healthy and thriving.
Tips for First-Time Tappers
Here are a few helpful hints to make your maple tapping experience even sweeter:
- Backup Buckets: It’s always a good idea to have extra collection containers on hand. On prime sap days, your buckets may fill up faster than you think.
- Keep an Eye on the Weather: Sap flow is most active when daytime temps are above freezing and nights are below, so watch the forecast to predict your best sap collection days.
- Other Maple Species: While sugar maples are the gold standard, red, silver, and even boxelder maples can also be tapped. Just remember that trees with lower sugar content will require more sap to make the same amount of syrup.
Fun Facts About Maple Syrup
- Sap Flows Differently Each Day: Some days might give you a flood of sap, and others, just a few drips. Don’t be discouraged—nature has its own rhythms.
- It Takes A Lot of Sap: Remember, it takes 40 gallons of sap to make 1 gallon of syrup. But when you taste that first spoonful, you’ll realize it was worth every drop.
- Sugar Sand: Don’t worry if you see sediment in your syrup—this is known as sugar sand, and it’s totally natural. Just be sure to filter it out during your boiling process for that smooth syrupy finish.
- Health benefits: Maple syrup lacks vitamins, but it is a good source of minerals like manganese and contains antioxidants that may support brain health and lower cholesterol. However, maple syrup is bad for your teeth, unlike some organic food.
The Sweetest Reward
Tapping maple trees is a beautiful way to connect with nature and enjoy a sweet reward at the end. There’s something so satisfying about making your own syrup, knowing it came from your backyard, and savoring it over pancakes or waffles.
It’s a process that requires patience, but it’s well worth the effort. Start small, experiment with different methods, and enjoy every step of the way.
Before long, you’ll be serving up delicious, homemade maple syrup with pride. Let the sap flow, and enjoy the sweetness of nature’s gift!